
This is the vision of the decentralized web, also known as Web3. In this blog post, we will explain what Web3 is, why it matters, and how you can get started with it.
What is Web3?
Blockchain is best known for powering cryptocurrencies like Bitcoin and Ethereum, but it can also be used to create other types of DApps that run on smart contracts, which are self-executing codes that enforce the rules and logic of the application. Some examples of DApps include decentralized social media platforms, marketplaces, games, identity systems, file storage services, and more.
Web3 aims to restore the original vision of the web as a network of information systems interconnected via hypertext links, but with added benefits of decentralization, such as:
- Censorship-resistance: No one can block, alter or delete your content or data without your permission.
- User sovereignty: You own and control your identity, assets, and data. You can choose who to share them with and how to monetize them.
- Trustlessness: You don’t need to trust or depend on third parties to verify or facilitate your transactions. You can rely on the code and the Network instead.
- Interoperability:You can access and use different DApps across different blockchains and platforms with a single identity and wallet.
- Innovation:You can create and participate in new types of applications and services that are not possible or feasible on the centralized web.
Web 3.0
Web 1.0 vs. Web 2.0 vs. Web 3.0
| Web 1.0 | Web 2.0 | Web 3.0 |
|---|---|---|
| The first version of the web, where you could only look at web pages and information with your browser and click on links | The second version of the web, where you could also talk and make things on websites and apps with your friends, blogs, videos, etc. | The third version of the web, where you can also own and control your name, data and things on web networks and apps that don’t need a boss or a middleman |
| You can only read the web | You can read and write on the web | You can read, write and do things on the web |
| The web is run by big companies | The web is still run by big companies | The web is run by everyone who uses it |
| Examples: Mosaic, Netscape, Yahoo!, AltaVista | Examples: Google, Facebook, YouTube, Wikipedia | Examples: Ethereum, IPFS, Uniswap, OpenSea |
How to get started with Web3?
To get started with Web3, you will need two main things: a wallet and a browser.
A wallet is a software or hardware device that stores, sends, and receives cryptocurrencies and other digital assets. It also acts as your identity and gateway to the decentralized web, enabling you to sign transactions and interact with DApps.
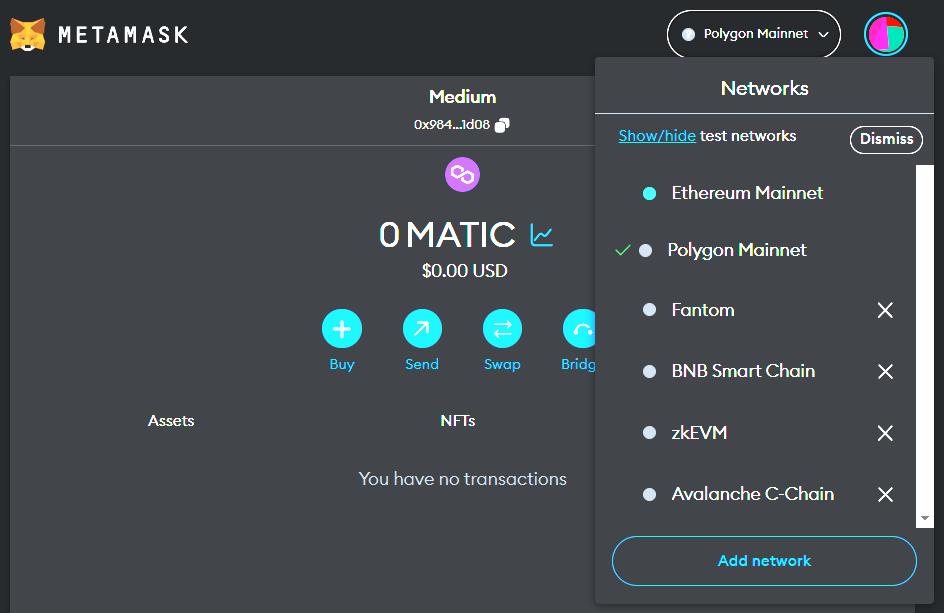
One of the most popular and user-friendly wallets and browsers for Web3 is MetaMask, which is available as a browser extension for Chrome, Firefox, Edge, and Brave and a mobile app for iOS and Android.

Metamask Logo
MetaMask allows you to create and manage multiple accounts (or addresses) for different purposes, such as personal, work, or gaming. It also supports multiple networks (or chains), such as Ethereum Mainnet, Ethereum testnets, Binance Smart Chain, and Polygon.
To install MetaMask on your browser or mobile device, follow these steps:
- Go to https://metamask.io/download/ and choose your preferred platform.
- Follow the instructions to download and install MetaMask on your device.
- Create a new account by choosing a password and writing down your secret recovery phrase (or seed phrase). This phrase is crucial as it allows you to restore your account if you lose access to your device or password. Keep it safe, and never share it with anyone.
- Congratulations! You have successfully installed MetaMask and created your first account.
How to do your first transaction on Web3?
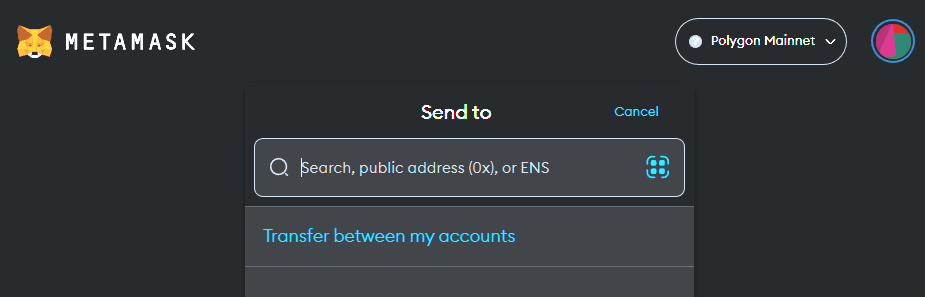
Now that you have MetaMask installed and ready, you can do your first transaction on Web3. For this example, we will use Polygon Mainnet (since it costs close to zero gas fees) as our Network of choice, but you can choose any other network that MetaMask supports.
Note: It might be possible that you don’t see Polygon Mainnet in your Networks tab. Simply Click on Add Network, and the Metamask will show you popular networks; click on Polygon, and It will automatically add it.
Metamask Wallet
To do your first transaction on Web3, follow these steps:
- To send or receive MATIC (the native cryptocurrency of Polygon), you will need some MATIC in your account. You can buy MATIC from an exchange like Coinbase or Binance or your Credit Card / PayPal (this option might be blocked in some countries). Alternatively, you can ask someone with MATIC to send you some.s
- To receive MATIC in your MetaMask account, you must share your address with the sender. In our case, both the sender and receiver are you.
- Your address is a long string of alphanumeric characters that starts with 0x. You can find it by clicking on your account name in MetaMask and copying it to your clipboard.
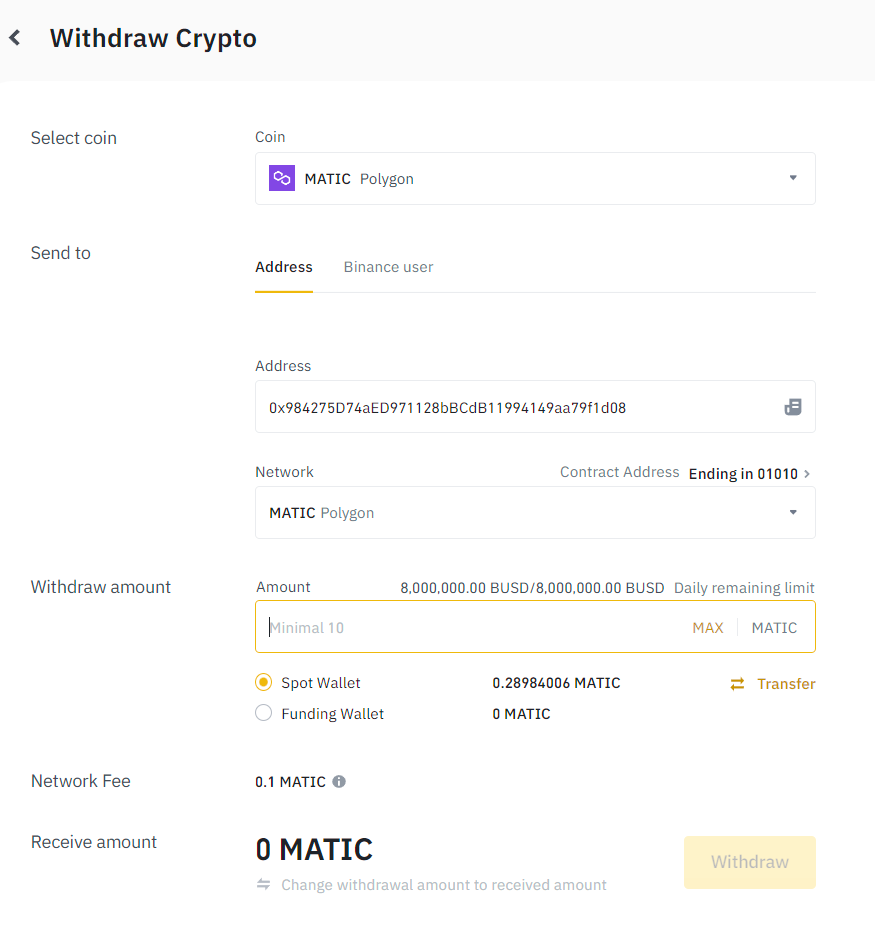
- Let’s say you bought some MATIC on Binance. Head over to the Withdraw section. Ensure the Network is selected as MATIC Polygon (Super Important, or you might lose your coins).
- Copy the address of your Metamask wallet in the address section, select the amount to withdraw, and click on Withdraw button. It will usually take 5–10 minutes (depending on the network congestion) to reach your wallet.
- To return MATIC from your MetaMask account to Binance, you must enter the recipient’s address in the “Send” tab in MetaMask. To get the address of your Binance wallet, head over to the Deposit section; choose the coin as MATIC and the Network as MATIC.
- Copy the address and paste it into Metamask. You can also enter the amount of MATIC you want to send and optionally add a message or data to the transaction. Then click “Next” to review and confirm the transaction details.
- Before confirming the transaction, you will need to pay a fee (or gas) for it to be processed by the Network. The cost depends on the complexity of the transaction and the congestion of the Network at any given time. You can adjust the fee by choosing a different gas price (or GWEI) in MetaMask. It is not recommended to mess with the gas price,as reducing the fees might take a long time for it to get confirmed, or it might get rejected by the Network. Note if the transaction is rejected, the gas fees are not refunded. The higher the gas price, the faster your transaction will be confirmed and the more expensive it will be.
- Once you are happy with the transaction details and fee, click “Confirm” to broadcast your transaction to the Network. You can track the status of your transaction by clicking on the “Activity” tab in MetaMask or by entering your transaction hash (or TXID) in a block explorer like Polygon Scan (Note: different blockchains have different explorers).
- Congratulations! You have successfully done your first transaction on Web3.

Metamask Address
Binance Withdraw Page

Binance Deposit Page
Binance Deposit Page
What’s next?
Uniswap: A Decentralized Exchange
You have just scratched the surface of what Web3 has to offer. There are many more DApps that you can explore and use on Web3, such as:
- Uniswap: A decentralized exchange that allows you to swap any ERC-20 token without intermediaries or fees.
- OpenSea: A marketplace for non-fungible tokens (NFTs) representing unique digital assets like art, music, games, or collectibles. If you like to check out some NFTs that I made, head over to my NFTs section.
- Decentraland: A virtual world where you can create, explore, and trade land parcels, buildings, and items.
- MakerDAO:A decentralized lending platform that allows you to borrow stablecoins (DAI) by locking up collateral (ETH).
- Compound: A decentralized protocol that allows you to earn interest on your crypto assets by lending them out or borrowing them from others.
- To discover more DApps, you can visit websites like https://dappradar.com/ that rank and review different DApps based on various criteria.