

This article is a follow-up to my previous article, where I discussed the basics of authentication. I try to simplify the login and sign-up process. You can refer to that article here:
How Authentication Works: A Step-by-Step Explanation of the Process Behind Signing Up and Logging In
I recently wanted to build a project where I was required to have a feature to authenticate users.

Whereas this article is more of a hands-on. We’ll be building a simple Next.JS application; we’ll work through both the frontend and the backend part. The codebase is available on the GitHub, so if you want to get your hands dirty, head over to the GitHub and fork it:
Github: confusedconsciousness/login-flowAfter this article, you’ll understand everything from how login/sign-up works to what are cookies, middleware, JWT, etc.
Sounds Interesting? Let’s Get into it.
Okay, so for this project, I chose Next.js 13. It’s pretty good, actually, and if you haven’t tried it, you definitely should.
I went through their documentation on how to set up my project.
After running the following command, you’ll be presented with multiple options.
1npx create-next-app@latest1What is your project named? my-app (./)
2Would you like to use TypeScript? No / Yes (No)
3Would you like to use ESLint? No / Yes (No)
4Would you like to use Tailwind CSS? No / Yes (Yes)
5Would you like to use `src/` directory? No / Yes (No)
6Would you like to use App Router? (recommended) No / Yes (Yes)
7Would you like to customize the default import alias? No / Yes (No)I went with all the defaults instead of the project name. Instead of creating a new folder, I decided to have all my files in the working directory, so I typed ./
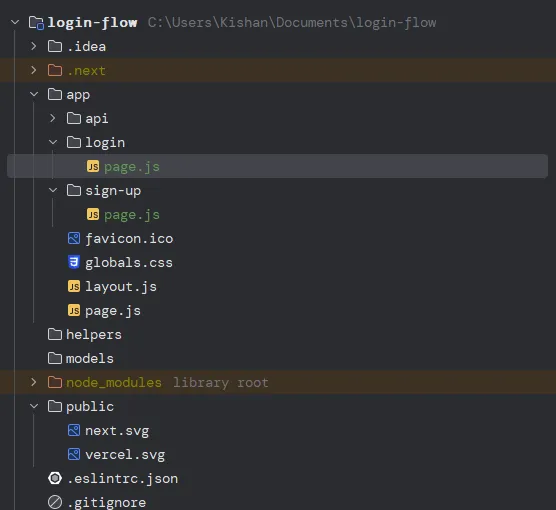
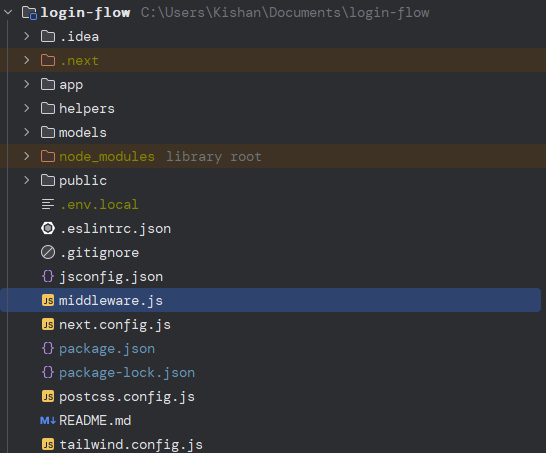
The project structure looked something like this after running. npx create-next-app@latest

Here is what my package.json looks like; please make sure that we have the same next version:
1{
2  "name": "login-flow",
3  "version": "0.1.0",
4  "private": true,
5  "scripts": {
6    "dev": "next dev",
7    "build": "next build",
8    "start": "next start",
9    "lint": "next lint"
10  },
11  "dependencies": {
12    "autoprefixer": "10.4.15",
13    "axios": "^1.5.0",
14    "bcrypt": "^5.1.1",
15    "eslint": "8.48.0",
16    "eslint-config-next": "13.4.19",
17    "jsonwebtoken": "^9.0.2",
18    "mongoose": "^7.5.1",
19    "next": "13.4.19",
20    "postcss": "8.4.29",
21    "prettier": "^3.0.3",
22    "react": "18.2.0",
23    "react-dom": "18.2.0",
24    "react-spinners": "^0.13.8",
25    "tailwindcss": "3.3.3"
26  }
27}
Our basic web app needs to have a frontend and a backend.
A frontend is how your web app looks like, i.e., how it will look to a user. For example, we’ll have a simple login / sign-up page. We won’t be focusing too much on the designing part, but yes, one can choose to spend time on it since it is the frontend that attracts user and the backend that retains it.
A backend takes care of handling the data entered by you and communicating with other services or databases. It has APIs that are nothing but endpoints to which we submit or retrieve the data/information.
As I said, there is a reason why I chose Next.JS while developing the app, I don’t have to create the backend part separately altogether. It is pretty straightforward on how we can define a backend and a frontend aspect. Enough babbling; let’s start with running the project.
To run your project, go to the terminal and make sure you are inside the project:
1$ cd ~/login-flow
2$ npm run dev
You’ll see the following logs in your terminal:
1$ npm run dev
2> login-flow@0.1.0 dev
3> next dev
4- warn Port 3000 is in use, trying 3001 instead.
5- warn Port 3001 is in use, trying 3002 instead.
6- ready started server on [::]:3002, url: <http://localhost:3002>
7- event compiled client and server successfully in 621 ms (20 modules)
8- wait compiling...
9- event compiled client and server successfully in 334 ms (20 modules)
10- wait compiling /page (client and server)...
11- event compiled client and server successfully in 7.8s (426 modules)
12- wait compiling...
13- event compiled successfully in 461 ms (235 modules)
14- wait compiling /favicon.ico/route (client and server)...
15- event compiled client and server successfully in 1784 ms (472 modules)
As you can see, our server is running on port 3002, ideally, it should run on 3000, but since I have other projects running and using those ports, NextJs will try to figure out the first available port it gets from 3000. In this case, it is 3002. If you keep running this project and try creating a new project and run it, it will occupy port 3003. In this way, we don’t have to worry about the terminal throwing an ugly error:
1Port 3000 is occupied, please close it and try again.If we head over to our browser and type localhost:3002 (or 3000), depending on which port your project is running on, we’ll be presented with a welcome screen by Vercel. Something like the following, but if it is different, don’t worry; these guys keep updating the UI to look more and more presentable.

vercel
No matter how presentable it looks, we have to let it go. 😢 and build our very own award-winning page.
Let’s go back to the structure of our project; I’d like to create a few directories. We’ll create a directory called models and helpers that would be present at the same level as our app directory. Sounds confusing? Github repo is the answer. You can open it side by side and consult.
1$ mkdir models
2$ mkdir helpers
Our model's folder will contain the MongoDB schema, helpers will contain utility functions; more on that later.
Since we are creating an authentication system, creating a Login and SignUp page would make sense.
For example, if someone wants to login, they should be able to do that by visiting http://localhost:3000/login , and if they want to sign up, they can do that by visiting
1http://localhost:3000/sign-upThe way we can do that in NextJs is to create two directories called login and sign-up inside the app directory, and each of those directories must have a file called page.js (this is super important).
You may remember that I said we would be working on both the front and backend parts. There is a thumb rule: if you are working on the frontend part, you have to name the file as page.js and if you are working on a backend part, you have to name the file as route.js and that, too, shall be inside a directory called api inside the app directory.
Too confusing, isn’t it? Yeah, I agree, but once you get a hold of it, this makes so much sense and is easy to interpret.
Please Note: All the backend code goes inside api directory.After creating all our directories and files inside it, here is what it will look like.
Since we are working on an authentication system, we’ll need to store the username, email, and password somewhere, right? For that, we’ll need a DB, and for this tutorial, we’ll be using MongoDB.
It is pretty straightforward to set it up. We’ll be using the cloud setup. If you already know how to do that, you can skip this section.
- Go ahead and visit: https://cloud.mongodb.com/ and sign up for free. You’ll be asked a bunch of questions, just fill them up and click on finish.
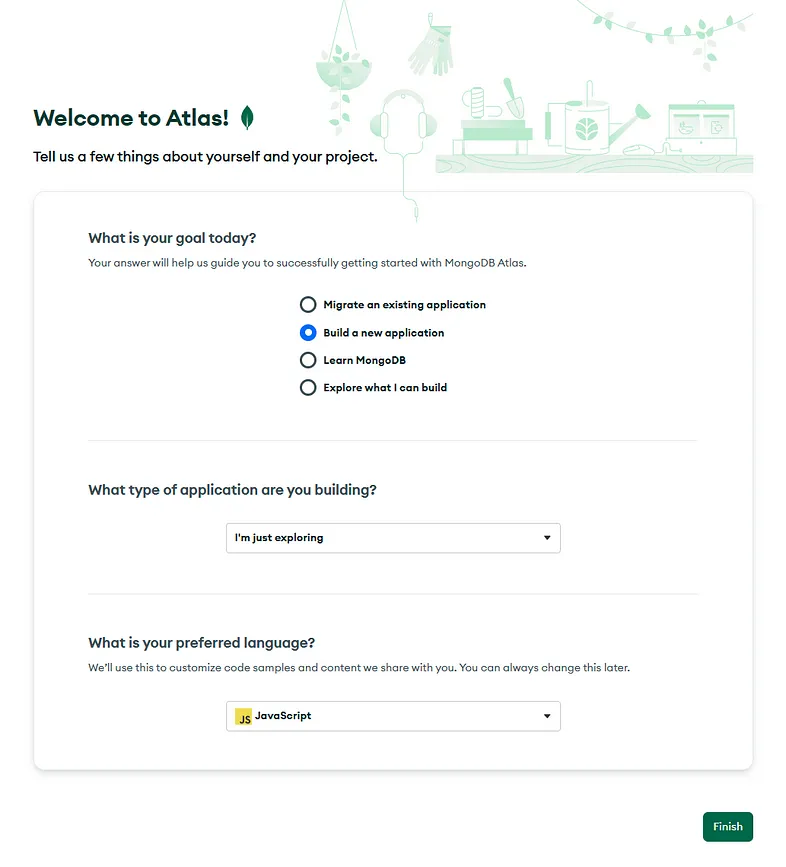
Atlas Cloud
- Choose the M0 free; it provides you with 512MB of space. Pick up a provider; in our case, we’ll be going with AWS and select the region that is closest to you; in my case, it is Mumbai. Click on Create.
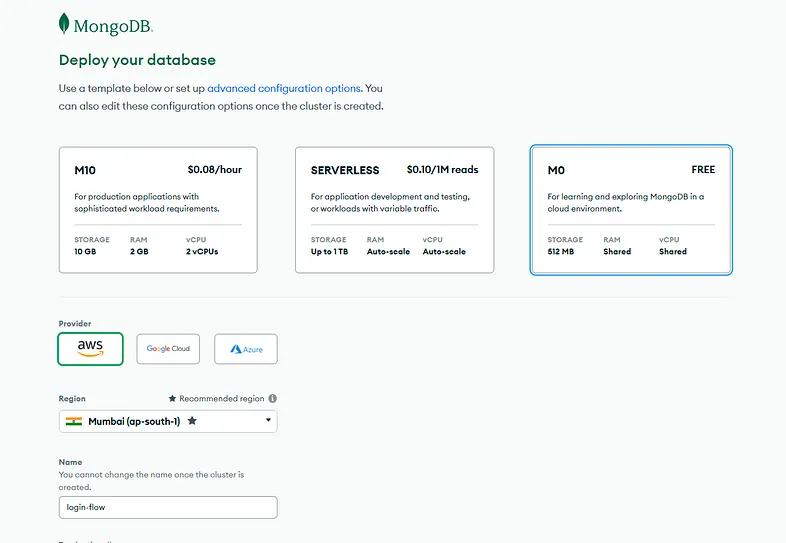
Deploy your Database
- You’ll be then presented to Quickstart, where you’ll be asked how you would like to connect to the DB. Choose Username and Password since it is easy that way, and click on Create User.

Quickstart
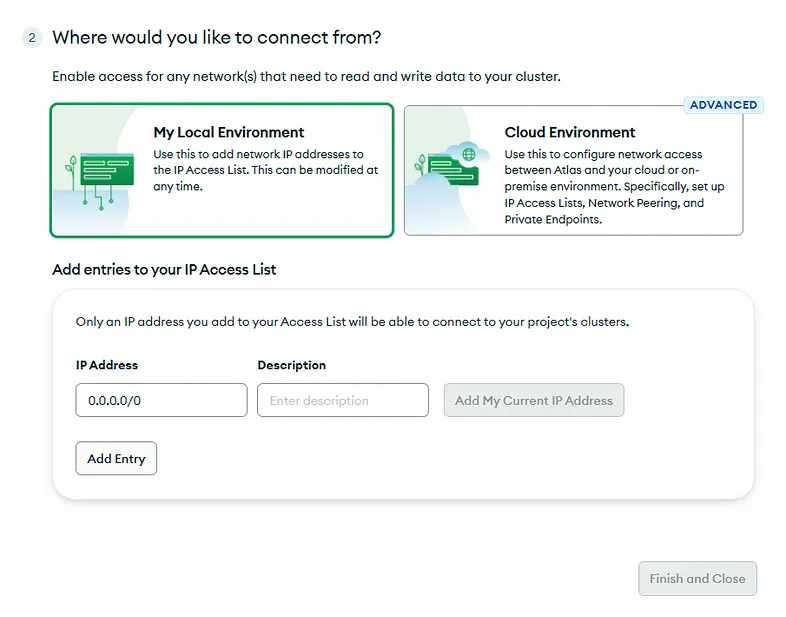
- You’ll then be asked how you would like to connect; click on ‘My Local Environment.’ It’ll ask you to provide the IPs that you wish to whitelist. For simplicity, let's put 0.0.0.0/0 and click on Finish and Close.
Quickstart
- You’ll be presented with the following screen; go ahead and click on View Database Deployment.
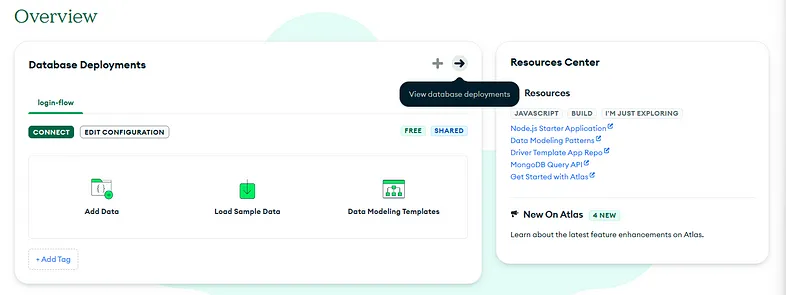
Overview
- Now is the time to connect to your database; simply click on connect. In the Connect to your application, click on Drivers.

Connect Your Application
- Since we are using Node.js, we’ll have to install the driver. So go ahead and open up your terminal and install the MongoDB.
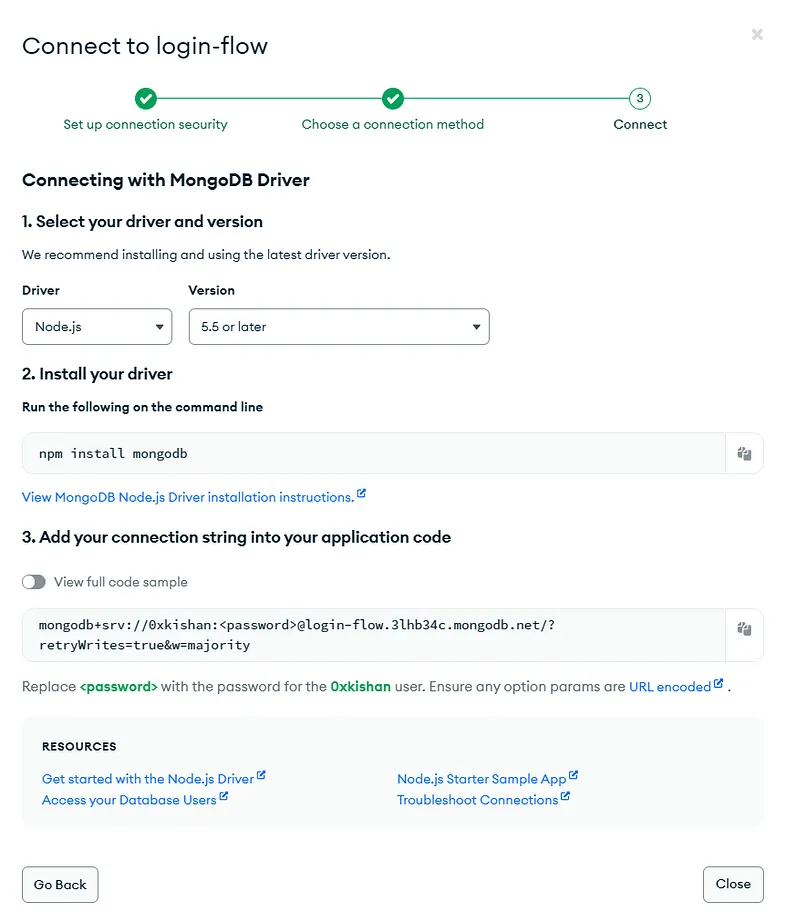
Install
- Copy the connection string and replace 0xkishan, which is my username, with yours, add your password where it says <password>, and remove the brackets (<>).
- Once copied, create a .env.local file in your repo and save this copied string as follows; of course, don’t forget to replace the username and password with your own. Don’t blindly copy my URL since it will be different from yours.
1npm install mongodb1MONGODB_URL=mongodb+srv://<username>:<password>@login-flow.3lhb34c.mongodb.net/
2JWT_TOKEN_SECRET=thisissecretdontdiscloseLet's Get Connected with DB
Following is the code to connect to the DB. It is mostly self-explanatory, we’ll be calling this function whenever we want to talk to our DB.
1/login-flow/helpers/mongoose.js1
2import mongoose from "mongoose";
3
4let isConnected = false;
5export const connectToDB = async () => {
6 // mongoose.set("strictQuery", true);
7 if (!process.env.MONGODB_URL) return console.error("MONGODB URL not found");
8 if (isConnected) return;
9 try {
10 await mongoose.connect(process.env.MONGODB_URL);
11 isConnected = true;
12 } catch (error) {
13 console.error("Connection failed with MongoDB");
14 }
15};Once done, let’s write some models on how we are going to save the data in our DB. In order to save the data, you’ll have to provide MongoDB with a schema that tells what fields are you going to save and what their types are.
1import mongoose from 'mongoose'
2
3const userSchema = new mongoose.Schema({
4    username: {
5        type: String,
6        required: [true, "Please enter your username"],
7        unique: true
8    },
9    email: {
10        type: String,
11        required: true,
12        unique: true
13    },
14    password: {
15        type: String,
16        required: true
17    },
18    isVerified: {
19      type: Boolean, default: false
20    },
21    isAdmin: {
22        type: Boolean, default: false
23    },
24    verifyToken: String,
25    verifyTokenExpiry: Date
26})
27const User = mongoose.models.users || mongoose.model("users", userSchema)
28export default User
Let me define each field one by one so that we know what we are getting into.
It is pretty obvious that we need to ask for an email and password, but what is username, it is something that uniquely identifies an entry inside the DB. You may ask, but that can be done via email as well, and you’d be absolutely right, but let’s say you want to share your profile with your friend. Will you be sharing your email with him? No, right? username is something public, and it has no sensitive information associated with it. It can be gibberish and will uniquely identify your account across multiple users. So it is always good to have a feature.
Now, you might have seen some cases where after signing up, you are asked to click on a link that is being sent to you on your email for you to get verified. Until then, your account is restricted to accessing a few features, and that is why we have isVerified field in our schema.
You may want to grant a few users special privileges, and that is why we have isAdminWell, we can have roles instead, and one of the roles can be admin, but let’s go with this only since it is simple.
Coming back to the way authentication works, I went into how it works in great detail in my previous blog, which you can refer to:
How Authentication Works: A Step-by-Step Explanation of the Process Behind Signing Up and Logging In
I recently wanted to build a project where I was required to have a feature to authenticate users.
But let me briefly explain what actually happens on a very high level, when you sign up via an email, you usually get a verify you account mail in your inbox. In that, you are provided a link that you have to go to for you to complete the onboarding process, after which the server generates a token and sets it into your cookies so that the next time you login, it knows who you are by looking up in the DB (verifyToken) and the one that is passed in the request from your cookies. Once it matches, the authentication process completes.
But, what if my verifyToken gets leaked? Well, that is why we have verifyTokenExpiry. There are some institutions, especially financial that are asked to keep the expiry of one day, so even if you logged in yesterday, you’ll be logged out after a day; in that case, you basically login using your email and password, but this time the server doesn’t send you a mail because it has already verified you earlier, so it skips that part and simply generates a token and save it in your cookies.
Again, if you want an in-depth understanding of how the login/sign-up process works, I highly recommend you go through that article.
Let’s Sign Up
Before moving forward, let me re-iterate this, there is a backend and a frontend part to it. The frontend part will take the information in a form. It will ask for the username, email, and password. Once the user has filled in all that information, they submit it. What happens then?
The information is sent to the server, which is our backend part, but as I mentioned, when using Next.Js, the way you define that you are working on the server side is what you name the file.
For backend: route.js
For frontend: page.js
Let’s first build our backend
Backend code will go where? If you are paying attention, it will go inside /app/api/sign-up/route.js
Let's install the necessary libraries. We'll use bcrypt to hash our password and add salt to it.1$ npm i bcrypt1import connectToDB from '@/helpers/mongoose'
2import {NextResponse} from "next/server";
3import User from "@/models/user.models";
4import bcrypt from "bcrypt";
5
6export async function POST(request) {
7 await connectToDB();
8 try {
9 const body = await request.json();
10 const {username, email, password} = body;
11 // let's check if the user already exists, if that's case we don't want to create a duplicate user
12 const user = User.findOne({email})
13 if (user) {
14 return NextResponse.json({error: "User already exists"}, {status: 400});
15 }
16 // hash the password, you don't want to save it as a plain text
17 const salt = await bcrypt.genSalt(10);
18 const hashedPassword = await bcrypt.hash(password, salt);
19 // save the user
20 const newUser = new User({username, email, password: hashedPassword});
21 const savedUser = await newUser.save();
22 return NextResponse.json({message: "User created successfully", success: true, savedUser}, {status: 200});
23 } catch (error) {
24 return NextResponse.json({error: error.message}, {status: 500});
25 }
26 return request;
27}Whenever we want to update the state of the server, we use POST method, and that is why the function is causer POST; please note this is a new feature in next.js. If you want to have an GET on the same endpoint, all you need to do is create a function in the same file and use it.
1export async function GET(request) {}The server will receive the request that will be sent by the frontend, and it will contain all the useful information that the user filled in, such as username, email, and password.
So all we are doing is destruct it from the payload. Why? Because we need to perform few checks. What if the user is already created?
Do you want to create a duplicate user? Nope, right? For this reason, we have a check where we call the DB.
1const user = User.findOne({email})Also, we don’t want to save the password as plain text, and that is why we are hashing it. But wait, there is more to it; what is salt?
What is Salt?
Salt is a randomly generated number or characters that are added to your password so that even if the two people have the same password, their hashes will be totally different.
Adding salt adds randomness to the hashing process. Let’s say you used a hashing algorithm called SHA256, and your password was jesus; the hash will be following.
1SHA256(jesus) → A54E71F0E17F5AAF7946E66AB42CF3B1FD4E61D60581736C9F0EB1C3F794EB7CIf someone has created a map of common words vs. their hash, they can reverse lookup and figure out your password, and all our efforts of hashing it will go in vain. Here is where salting helps.
This prevents us from Rainbow Table Attacks, which are nothing but precomputed tables of hash values of a large number of possible passwords.
After doing that, we simply persist the data on our DB.
Let’s build our frontend
Please note: we have used “use client” This is also one way to tell that this code will be client-side since it uses hooks such asuseEffect and useState
1npm i react-spinners axios1"use client";
2import { useEffect, useState } from "react";
3import { useRouter } from "next/navigation";
4import Link from "next/link";
5import { BounceLoader } from "react-spinners";
6import axios from "axios";
7
8const Page = () => {
9 const router = useRouter();
10 const [loading, setLoading] = useState(false);
11 const [user, setUser] = useState({
12 email: "",
13 password: "",
14 username: "",
15 isVerified: false,
16 isAdmin: false,
17 });
18 const [buttonDisabled, setButtonDisabled] = useState(false);
19 useEffect(() => {
20 if (
21 user.email.length > 0 &&
22 user.password.length > 0 &&
23 user.username.length > 0
24 ) {
25 setButtonDisabled(false);
26 } else {
27 setButtonDisabled(true);
28 }
29 }, [user]);
30 const onSubmit = async (e) => {
31 setLoading(true);
32 e.preventDefault();
33 try {
34 const response = await axios.post("/api/sign-up", user);
35 if (response.status === 200) {
36 router.push("/login");
37 }
38 } catch (error) {
39 console.log("error", error);
40 } finally {
41 setLoading(false);
42 }
43 };
44 return (
45 <div
46 className={
47 "flex flex-col items-center justify-center h-screen p-5 w-full"
48 }
49 >
50 <h1 className={"text-2xl my-16"}>Sign Up</h1>
51 <label className={"flex flex-col items-start"} htmlFor={"username"}>
52 Username
53 </label>
54 <input
55 className={
56 " text-black my-4 p-2 rounded border border-gray-300 focus:outline-none focus:ring-2 focus:ring-white"
57 }
58 type={"text"}
59 id={"username"}
60 placeholder={"Username"}
61 value={user.username}
62 onChange={(e) => setUser({ ...user, username: e.target.value })}
63 />
64 <label htmlFor={"email"}>Email</label>
65 <input
66 className={
67 "text-black my-4 p-2 rounded border border-gray-300 focus:outline-none focus:ring-2 focus:ring-white"
68 }
69 type={"text"}
70 id={"email"}
71 placeholder={"Email"}
72 value={user.email}
73 onChange={(e) => setUser({ ...user, email: e.target.value })}
74 />
75 <label htmlFor={"password"}>Password</label>
76 <input
77 className={
78 "text-black my-4 p-2 rounded border border-gray-300 focus:outline-none focus:ring-2 focus:ring-white"
79 }
80 type={"password"}
81 id={"password"}
82 placeholder={"Password"}
83 value={user.password}
84 onChange={(e) => setUser({ ...user, password: e.target.value })}
85 />
86 <button
87 className={
88 "mt-4 border-2 border-white py-2 rounded hover:bg-white hover:text-black p-2 cursor-pointer"
89 }
90 onClick={onSubmit}
91 disabled={buttonDisabled}
92 >
93 {loading ? <BounceLoader className={""} /> : "Sign Up"}
94 </button>
95 <Link className={"text-sm my-2"} href={"/login"}>
96 Already have an account? Login
97 </Link>
98 </div>
99 );
100};
101export default PageOur beautiful Rendered Sign-Up page
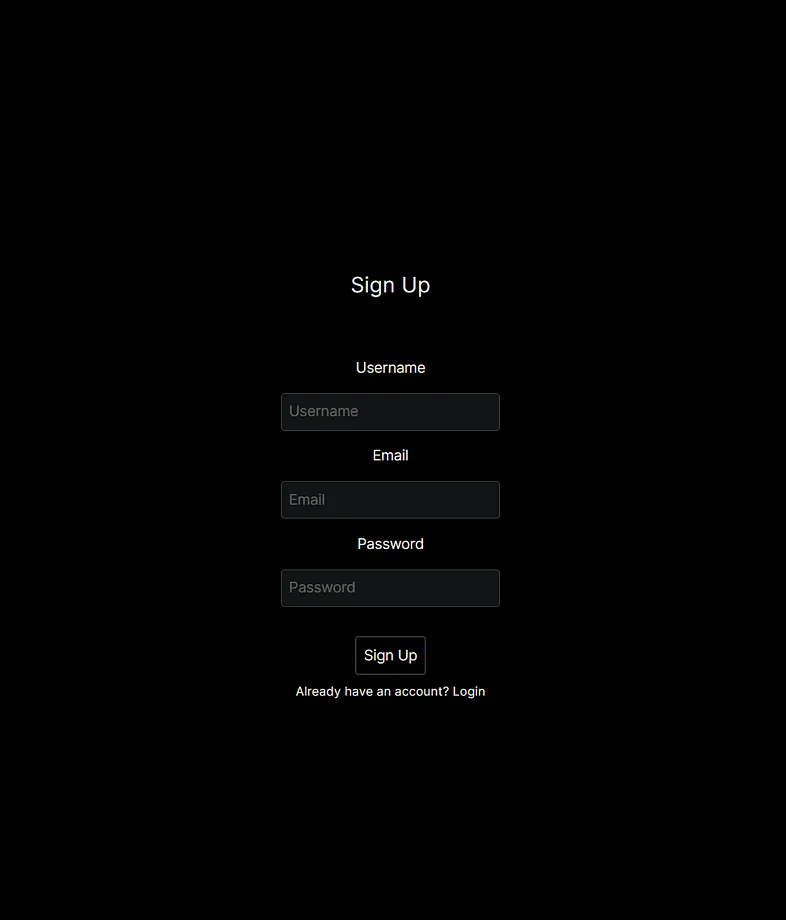
sign-up
The front-end code is mostly about styling the form. Once the submit button is clicked, our onClick function is invoked. All it does is gather user data that we have obtained from the form and send it to /api/sign-up (backend).
If we get 200 status from the backend, which means the user is successfully signed up, we route them to the login page. But remember, the user has not been verified yet. Their verify field is still marked as false.
If you check the DB, we'll have one entry:
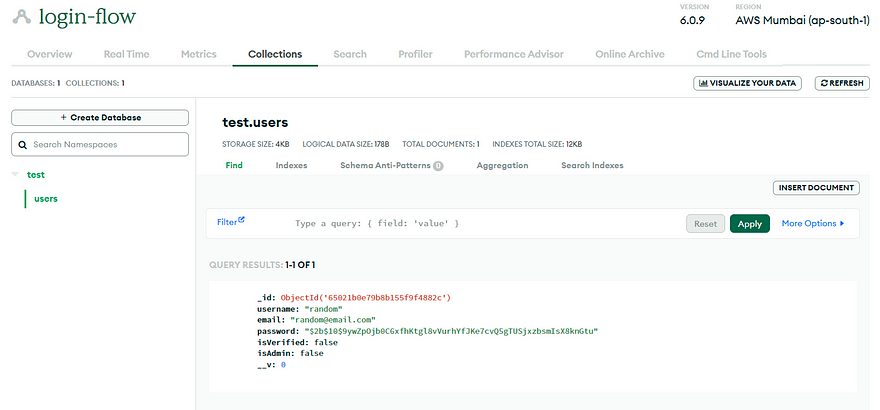
DB Entry
This you can find in the collections tab and by choosing the users collection under the test database.
Let's Login
We'll perform the same operation; we'll first build the backend and then our frontend.
Let's build our backend
Again, the backend code will go where? Yes, you are right, it will go /app/api/login/route.js
In this section, we'll be needing the following dependencies:
1npm i jsonwebtoken1import { connectToDB } from "@/helpers/mongoose";
2import { NextResponse } from "next/server";
3import User from "@/models/user.models";
4import bcrypt from "bcrypt";
5import jwt from "jsonwebtoken";
6
7export async function POST(request) {
8 await connectToDB();
9 try {
10 const body = await request.json();
11 console.log(body);
12 const { email, password } = body;
13 // check if the user already exists
14 const user = await User.findOne({ email });
15 if (!user) {
16 return NextResponse.json(
17 { error: "User doesn't exists" },
18 { status: 400 },
19 );
20 }
21 // check if the password is correct
22 const valid = await bcrypt.compare(password, user.password);
23 if (!valid) {
24 return NextResponse.json(
25 { error: "Invalid Credentials" },
26 { status: 401 },
27 );
28 }
29 // after we verified the user is valid, we can create a JWT token and return it to the user cookies
30 // first create token data
31 const tokenData = {
32 id: user._id,
33 username: user.username,
34 email: user.email,
35 };
36 const token = await jwt.sign(tokenData, process.env.JWT_TOKEN_SECRET, {
37 expiresIn: "1d",
38 });
39 // create a next response
40 const response = NextResponse.json({
41 message: "Logged in successfully",
42 success: true,
43 });
44 // set this token in the user cookies
45 response.cookies.set("token", token, { httpOnly: true });
46 return response;
47 } catch (error) {
48 console.log(error);
49 return NextResponse.json({ error: error.message }, { status: 500 });
50 }
51}Our backend will be receiving two things from our frontend, email and password, if you wish, you could also ask for a username and password, but since there can be a scenario or a requirement from your side where you do allow the username to get changed all the time. In that case, it is better suited to ask for email since the user has changed their username so many times that they don't even remember.
Based on the email, we'll search the database to see if there is a user present corresponding to that email; if there is not, we'll throw 400. Otherwise, we'll go ahead and match the provided credentials with what we saved in DB.
If you remember, we saved the hashed password in the DB. So for us to verify this password that we got from the frontend, we have to apply the same hash and salting and compare. Luckily, all of this is taken care of by the bcrypt library.
All you need to provide is your hashed token (user.password) and the original password.
Once we verified everything, we need a way to remember that we verified the user. For this, we use cookies.
Before that,What are cookies?
Cookies are small pieces of text sent to your browser by a website you visit. They help that website remember information about your visit, which can both make it easier to visit the site again and make the site more useful to you.
We'll now create data that we want to send in cookies, let's call it tokenData, and it is up to you what details you wanna add to it. For this article, we'll add a username, email, and id. (id is an internal construct of MariaDB that uniquely identifies an entry in the collection (or table)).
After creating the data, we could simply send this to cookies, but would it be a good idea? No, right, since it contains sensitive information.
That is why we use JWT, but what is its role?
Role of JWT
JWT (JSON Web Token) plays a critical role in this authentication process:
- After verifying the user's existence and password, a JWT token is generated.
- The token contains user-related data like ID, username, and email.
- This token is signed using a secret key, making it tamper-proof (you can define the key in .local.env as anything for testing purposes).
- The client can include this token in subsequent requests to prove their identity without the need to resend their credentials (e.g., username and password) with each request.
- The server can verify the token's authenticity using the secret key and extract user information from it.
- JWTs provide stateless authentication, improving scalability and reducing the need for server-side session management.
Having done that, whenever a user logs in, they can see a token present in their cookie. If you are curious to know where can I find that.
Right-click on the webpage (localhost:3000) click on inspect, and go to the Application tab.

Inspect
Then in the storage section (present on the left side), click on cookies.

There you'll see your localhost:3000, click on it, and you'll see your token.

Token
Let's build our frontend
This is more of a styling thing; feel free to copy it and paste it. The only thing that needs attention is the onSubmit() function that is called when someone clicks on Login.
Here we are sending the information that we gathered in the user state using our form and passing it to the backend /api/login
Once we get 200 from the backend, we redirect the user to the profile page which we haven't made yet. So why not create a simple profile page?
1"use client";
2import { useEffect, useState } from "react";
3import { useRouter } from "next/navigation";
4import Link from "next/link";
5import axios from "axios";
6import { PropagateLoader } from "react-spinners";
7
8const Page = () => {
9  const router = useRouter();
10  const [user, setUser] = useState({
11    email: "",
12    password: "",
13  });
14  const [buttonDisabled, setButtonDisabled] = useState(false);
15  const [loading, setLoading] = useState(false);
16  useEffect(() => {
17    if (user.email.length > 0 && user.password.length > 0) {
18      setButtonDisabled(false);
19    } else {
20      setButtonDisabled(true);
21    }
22  }, [user]);
23  const onSubmit = async (e) => {
24    setLoading(true);
25    e.preventDefault();
26    try {
27      const response = await axios.post("/api/login", user);
28      if (response.status === 200) {
29        router.push("/profile");
30      }
31    } catch (error) {
32      console.log(error);
33    } finally {
34      setLoading(false);
35    }
36  };
37  return (
38    <div
39      className={
40        "flex flex-col items-center justify-center h-screen p-5 w-full"
41      }
42    >
43      <h1 className={"text-2xl my-16"}>Login</h1>
44      <label htmlFor={"email"}>Email</label>
45      <input
46        className={
47          "text-black my-4 p-2 rounded border border-gray-300 focus:outline-none focus:ring-2 focus:ring-white"
48        }
49        type={"text"}
50        id={"email"}
51        placeholder={"Email"}
52        value={user.email}
53        onChange={(e) => setUser({ ...user, email: e.target.value })}
54      />
55      <label htmlFor={"password"}>Password</label>
56      <input
57        className={
58          "text-black my-4 p-2 rounded border border-gray-300 focus:outline-none focus:ring-2 focus:ring-white"
59        }
60        type={"password"}
61        id={"password"}
62        placeholder={"Password"}
63        value={user.password}
64        onChange={(e) => setUser({ ...user, password: e.target.value })}
65      />
66      <button
67        className={
68          "mt-4 border-2 border-white py-2 rounded hover:bg-white hover:text-black p-2 cursor-pointer"
69        }
70        onClick={onSubmit}
71        disabled={buttonDisabled}
72      >
73        {loading ? <PropagateLoader /> : "Login"}
74      </button>
75      <Link className={"text-sm my-2"} href={"/sign-up"}>
76        Don't have an account? Sign Up
77      </Link>
78    </div>
79  );
80};
81export default Page;
Our Rendered Login Page
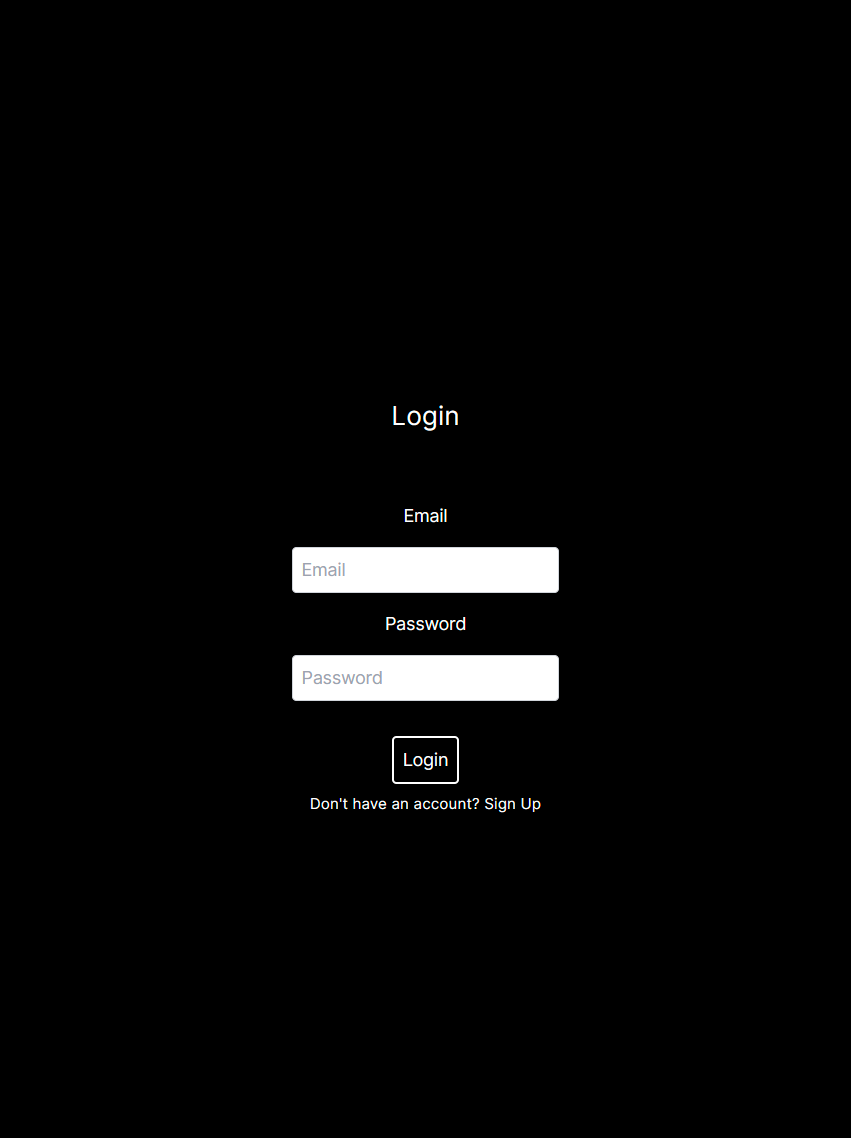
Login
The Profile Page
One can visit their profile at http://localhost:3000/profile; for that, we have to create a directory named profile, but where? correct, inside the app directory, the profile directory will contain what? a page.js file to show it is a frontend element. I will leave it to you to style it.
Some Caveats
Even if the user has logged in successfully, if he visits, /login what should happen? He shouldn't see the page, right? he should get redirected immediately to his profile page since there is no need for him to login once he already logged in.
But with the current setup, if he visits the /login endpoint, he'll see the login page; heck, he'll even see the sign-up page if he wishes to.
Also, what if the user is not logged in and he went ahead and typed http://localhost:3000/profile? Will he see this page? Yes, nothing is stopping him from doing that as well. We need a way to restrict some pages.
How can we fix this?
Well, we can fix this using middleware. Think of them as a function that is being executed before the request is completed.
1(request) → (middleware) → (response).In Nextjs, we have to create a file called middleware.js; it is like a predefined thing; we can't change the name the same way we have route.js and page.js. They have special meanings attached to them.
We need to create them at the same level (not inside) as the app directory.
In your application, there are two paths, one is public, which can be visited by anyone who is not registered, and there is a private path that can only be visible or accessible to those who are registered with you.
What we want our middleware to do is, check if the path is public or private and take action.
But before that, we have to provide a config for our middleware, letting it know when it should get triggered or come into action since there can be 1000 pages, and you only want these conditions on a few of the routes.
For our use case, we are only defining three routes that will trigger this middleware: /profile, /login, /sign-up
1import { NextResponse } from "next/server";
2
3// This function can be marked `async` if using `await` inside
4export function middleware(request) {
5  // there are some public paths and there are some protected paths
6  // the public path should not be visible when the user has the token
7  // the private path should not be visible when the user doesn't have the token
8  const path = request.nextUrl.pathname;
9  const isPublicPath = path === "/login" || path === "/sign-up";
10  const token = request.cookies.get("token")?.value || ""; // check if the token exists
11  if (isPublicPath && token.length > 0) {
12    // redirect them to their profile page
13    return NextResponse.redirect(new URL("/profile", request.nextUrl));
14  }
15  if (!isPublicPath && !token.length > 0) {
16    // redirect them to the login page
17    return NextResponse.redirect(new URL("/login", request.nextUrl));
18  }
19}
20// See "Matching Paths" below to learn more
21export const config = {
22  matcher: ["/profile", "/login", "/sign-up"],
23};
So, now if you are logged in and you try to visit the /login page, you'll be redirected to your /profile page. On the other hand, if you are a user who hasn't registered or logged in yet when opening your profile page, you'll be redirected to the /login page.
I hope this article gave you an in-depth understanding of how authentication works. Thank you for taking the time to read such a long article.
References: